A rain-soaked alley, a watchful face, and a small object that matters to the story: an AI noir thriller can start with a single compelling frame. The suspense comes from what the character notices, what the camera reveals, and what stays outside the light. Use O4Prompts by OrigaStock to explore lighting, camera angles, and movie looks, then take your image and motion prompts into the generation tools you prefer.
Start with a Simple Thriller Premise
Give the audience a question they can follow through visible action. In our original scene, an older investigative photographer carries an undeveloped film canister through a city at night. He needs to reach a lit doorway, but an unexpected sound makes him stop and look behind him.
The film canister gives the scene a concrete focus. His glance introduces uncertainty. The doorway provides a destination, so a short movement through the alley has a clear purpose. You can communicate these relationships through framing and sound before adding dialogue.
Keep your first sequence small: one protagonist, one route, and one interruption. A paused breath, a turn of the head, and a quick crossing into shelter give you several useful shots without requiring a large cast or a complicated set.
Define the ending before generating. Does he reach the doorway, notice that it is closing, or decide to take another route? Choose one outcome and make sure the final shot communicates it.
Explore the O4Prompts Lighting and Movie-Look Libraries
Open the O4Prompts Video Prompt Builder and browse its libraries for lighting, camera angles, and movie look. Use them to compare visual directions and build a brief that serves your scene. Choose the options closest to the mood you want, then make the final description specific to your character and location.
For this example, the direction is contemporary neo-noir: a dark city setting, cool teal edges, a restrained amber light source, natural skin texture, and deep shadows with enough detail to read the expression. These choices should work together throughout the sequence.
Use Cinematic Shots to develop the portrait and framing. Use Composition Lab to arrange the face, film canister, doorway, and empty space. Use Color Lab to refine the balance between cool shadows and warm practical light.
O4Prompts generates prompts for images and videos. Copy the resulting instructions into a compatible generator to create your stills and clips. You control the references, generation settings, and final edit in those separate tools.
Use Lighting to Direct Attention
Decide what the viewer must see in each frame. In the close-up, the photographer's eyes and the edge of his face carry the tension. In the wider shot, the lit doorway explains where he is going.
A narrow teal edge light can separate his bald head and charcoal coat from the alley. A softer, restrained light near the eyes keeps the glance readable. Allow the far side of the face to fall into shadow while retaining enough natural skin detail for the portrait to feel photographic.
Give the amber doorway a consistent place in the scene. Its reflected color can appear on wet pavement or the nearest part of the coat. This gives the lighting a visible source and helps connect different camera positions.
Check the frame at normal viewing brightness. If the expression disappears entirely, adjust the light on the face. Strong contrast is useful when the important action remains understandable.
Choose Camera Angles That Build Suspense
Use the camera-angle library in Video Prompt Builder to plan views with distinct purposes. A new angle should reveal information or change the viewer's relationship to the character.
| Camera position | What it shows | Use in this scene |
|---|---|---|
| Eye-level close-up | Eyes, expression, and a small change in attention | The photographer hears something and stops |
| Low rear three-quarter view | The coat silhouette and the route ahead | He turns toward the amber doorway |
| Over-the-shoulder view | The space the character is watching | The audience sees the empty alley beyond him |
| Wider establishing view | Street layout, doorway, and distance | His quick crossing becomes easy to follow |
Use the close-up to withhold some of the location, then let another view explain it. Empty space can make the audience look for something beyond the protagonist. Keep that space deliberate so it contributes to the story.
Track which way the character is looking and moving. Preserve those relationships when changing camera positions, especially if you plan to cut directly between the shots.
Build an Original Noir Reference Image
Our protagonist is an original older Black man with a bald head, clean-shaven face, deep brown eyes, and natural forehead lines. His charcoal raincoat and small silver film canister remain consistent across the scene. Define those visual anchors before asking for another angle.
Keep the skin and fabric tactile. Describe visible pores, fine lines, rain sheen, and subtle grain instead of a glossy or airbrushed finish. Let the environment have depth: nearby brickwork, a softer doorway, and distant blurred headlights.
Example noir-image prompt
“Create an original photorealistic neo-noir film still in a wide landscape frame. An older Black investigative photographer, about 60, has a bald head, clean-shaven face, deep brown eyes, and natural forehead lines. He wears a charcoal raincoat and holds a small round silver photographic film canister near his chest. Use a close eye-level three-quarter portrait, with his face on the right and atmospheric dark space on the left. He looks alertly just past the camera. Place him beside dark brickwork in a rain-soaked alley at night, with a softly glowing amber doorway and distant blurred headlights. Use a narrow teal-cyan edge light, readable eye detail, deep shadows, natural skin texture, subtle grain, and shallow depth of field. No text, logos, watermarks, or interface elements.”
Approve the still before adding motion. Check the hands, canister shape, face proportions, light direction, and rain reflections. An approved reference gives you a concrete standard for reviewing the later clips.
Change the Viewpoint and Preserve the Movie Look
The second reference uses a lower camera behind the photographer's shoulder, looking along the wet alley toward the lit doorway. The new angle reveals more of the route while keeping the same character, coat, and night-time lighting.
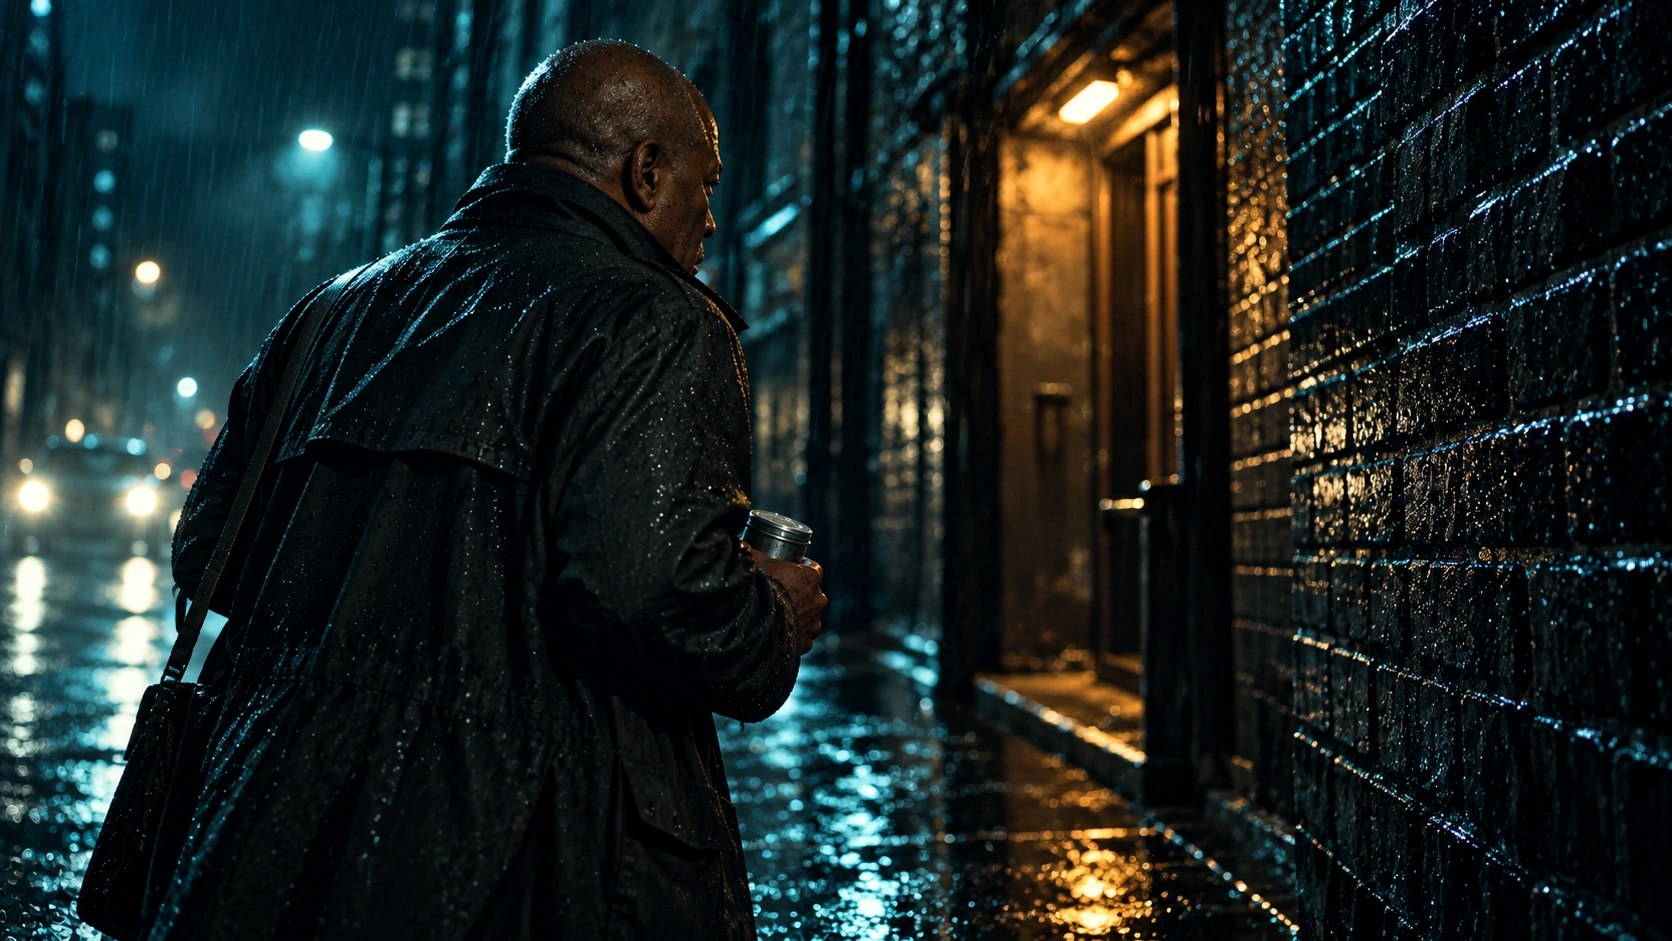
Use the movie-look library in Video Prompt Builder as a starting point for the sequence's visual rules. Keep shadow color, warm highlights, contrast, grain, and material texture coherent across both references.
Describe the changed camera position separately from the unchanged identity. Compare the images for age, head shape, coat details, and apparent time of night. The perspective can change substantially while the scene still feels continuous.
Turn the Frames into a Short Action Sequence
Build the sequence around four visible beats: he waits, notices a sound, moves toward the doorway, and reaches shelter. Give each clip one main action and one clear camera behavior.
Use Camera Movement to explore a restrained push toward the face or a controlled follow as he crosses the alley. In a tense close-up, a small change in gaze can be more useful than a large camera move. In the action shot, leave enough room to read his direction and footwork.
Example close-up motion prompt
“Use the approved photographer portrait as the visual reference. In one continuous shot, he holds the silver film canister close to his chest, hears a faint sound off-screen, and shifts his gaze toward it. Keep the movement restrained: a small eye movement, a subtle head turn, and a quiet breath. Preserve his facial identity, bald head, charcoal raincoat, hands, and natural skin texture. Use a slow controlled camera push while rain reflections move softly behind him. Keep the teal edge light and amber background source consistent. End with his attention fixed beyond the frame. No cuts, extra characters, added objects, text, or logos.”
For the next clip, use the wider reference and ask him to cross toward the doorway at a brisk pace. Describe a controlled camera follow and a clear ending near the entrance. Keep the action brief enough to evaluate before expanding the sequence.
For one available generation route, Higgsfield's official image-to-video guide explains how to supply a reference image and motion prompt. Use your preferred compatible tool, and check its selected model, reference controls, duration, and output options before generating.
Edit the Thriller Around Attention and Sound
Review each clip from beginning to end. Watch for a canister that changes size, unstable hands, altered facial details, raincoat drift, or a doorway that moves between shots. Simplify the action or correct the reference when a visible detail fails.
Cut when the character's attention changes or an action becomes clear. A sound can begin before the next image appears, giving the viewer a reason to anticipate the cut. Try restrained layers such as rain, a distant engine, approaching footsteps, and a brief change in ambience at the doorway.
Keep the sound's location understandable. If the photographer looks behind him, the off-screen sound should support that choice. Leave space around the turning point so the audience can notice his reaction.
Match the teal and amber balance across the edit, preserve readable shadow detail, and use grain consistently. Save the approved prompts, references, and settings together so another scene can continue the same visual direction.
Frequently Asked Questions
Where can I explore lighting, camera angles, and movie looks?
Browse the libraries in O4Prompts Video Prompt Builder, then describe your selected direction in terms of the specific character, location, and action. Cinematic Shots, Composition Lab, and Color Lab help develop the reference frames.
Can O4Prompts generate the finished noir film?
O4Prompts supplies the prompts. Create the images and video in compatible generation tools, then assemble the approved clips and sound in your editor.
How do I make a dark scene readable?
Decide what the audience needs to see, then keep light on that detail. In this scene, the eyes, canister, silhouette, and doorway give the viewer enough information to follow the action.
What makes the second camera angle useful?
It reveals the route and destination that the close-up withholds. Keep character identity and lighting consistent so the new view feels like part of the same scene.
Start with one question, one protagonist, and one visual direction. Explore the lighting, camera-angle, and movie-look libraries in O4Prompts Video Prompt Builder, prepare your reference frames, and develop a noir thriller through deliberate shots and a clear edit.